It doesn’t seem that long ago when I built a CCTV camera for my brother in law out of a dummy camera and a Raspberry Pi. Now there is an even lower power project that runs on a chip that can fit in the palm of your hand.

ESP32-CAM
Unlike the Raspberry Pi, which is a small board microcomputer (SBC) that requires an operating system to run. Microcomputer chips do many tasks and are versatile because you can update their program by connecting remotely to them, or by replacing the memory card.
The ESP32 chip is a micro controller instead of a microprocessor, which means you program one program into it and it simply repeats the sequence really well until it is turned off. Microcontrollers need a lot less memory and draw considerably less power than a microprocessor. In deep sleep, the ESP32 draws micro amps compared to the Raspberry Pi that needs a 2 amp power supply. You can power it from a solar panel or a battery for a long life.
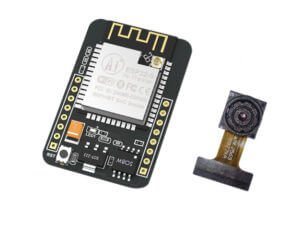
The ESP32-CAM is an ESP32 chip with a memory card slot, wifi and bluetooth as well as a 2MP camera.
Face Recognition
The ESP32-CAM module also features face recognition. You program the faces it needs to recognise and it can detect them in the captured photos, and if someone appears who it doesn’t know, it can trigger an alert.
Not bad for a board that costs around £9.
PIR sensor
One of the advantages of the pins on the module is that you can connect a PIR (Passive Infra Red) sensor that can detect movement. By setting up a PIR sensor, the module can be briefly woken up to capture images or video to either the memory card, or it can be linked to an Internet server that can be configured to alert you to activity.
Wifi & Bluetooth
The module has a built in antenna that enables the module to connect and create a wireless network, as well as connect with Bluetooth inside a house.
If you need to use the module over a longer range or outside, a small resistor needs to be moved on the board and the connector can be connected to a higher gain antenna.

Programming the ESP32-CAM
The ESP32-CAM module, like all ESP32 boards uses a language called Sketch to program the chip so that is does what you need it to.
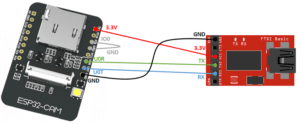
The ESP32-CAM doesn’t have a USB controller on-board, unlike the ESP32 boards do, but there are cheap adapter boards available. You simply install the free Arduino IDE software and install the ESP32 library. If you follow the guide in the Face Recognition video above, it will guide you through the process of setting up the IDE to program the ESP32-CAM.
Installing into a dummy CCTV camera
Kiril Peyanski demonstrates how to install the ESP32-CAM into a dummy CCTV camera housing.
The process is similar for the external dummy CCTV camera housing. Remember to waterproof your CCTV camera if you plan to install it outside.
You could power the ESP32-CAM from a single 9V battery, since the 5V pin is the regulator input and can take power from 4.3V to 12V, but you may find it works better from a USB portable battery pack.

