If you have an old drive you have removed from a computer that you want to reuse and utilise all the space, the chances are that there will be some parts like the recovery system that prevent you from using the entirety of the drive for your new purpose.
Computer Management
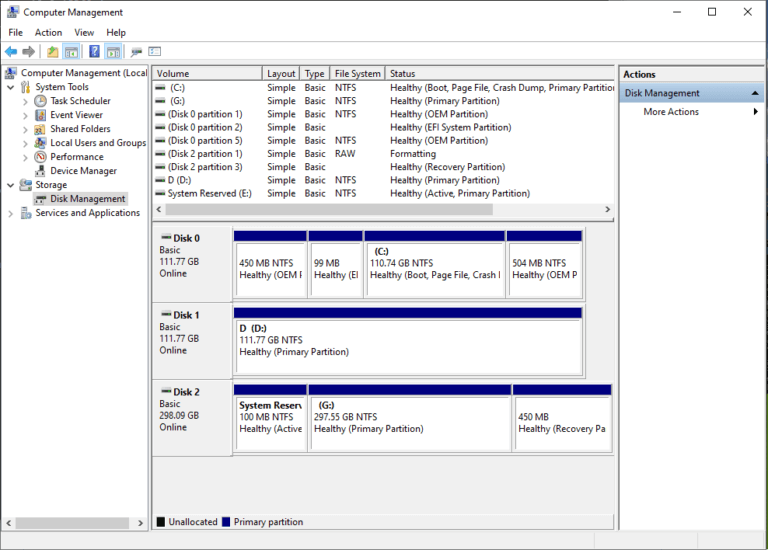
Computer Management is something that Microsoft calls a snap-in, but can be accessed on its own, simply type “Computer Management” in the search box on Windows 10. You will see in Disk Management that there are a number of disks, which Microsoft numbers. Disk 0 is the system drive, which is where Windows 10 starts from.
We can see that Disk 2 has 3 partitions (separated parts of the drive), and we can easily right click and format the first two partitions, but the Recovery partition cannot be touched with Computer Management, so we have to use the more advanced DiskPart command.
DiskPart
Back in 2000, DiskPart was introduced to replace fdisk, the original tool to manipulate partitions in DOS.
Search for DiskPart on Windows 10 and choose it from the list. It will ask for elevated privileges, click on Yes.
DiskPart is an incredibly powerful tool that can damage your drives very easily, especially if you choose the wrong disk.
We will use DiskPart to remove all three partitions, create a new partition that fills the entire drive, format the partition and assign a drive letter to it so we can use it in File Explorer easily.
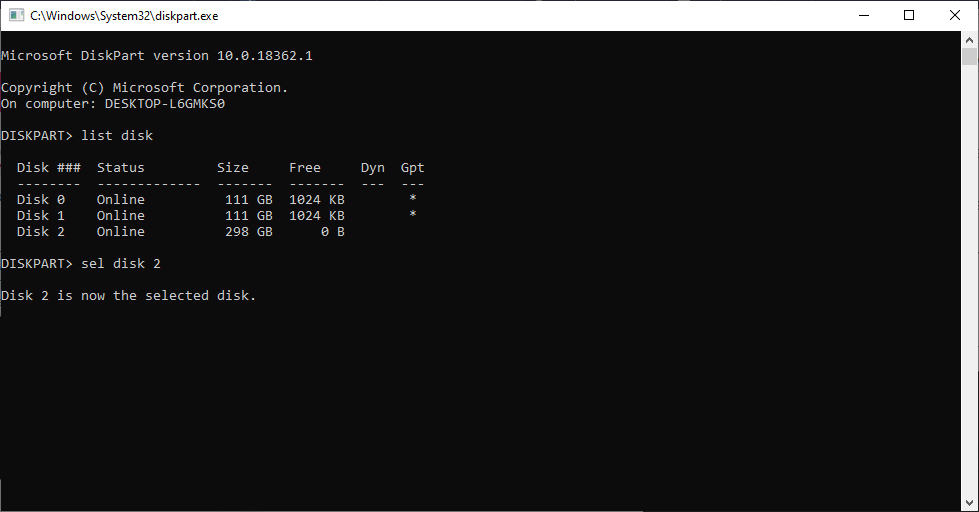
First we need to make sure we have selected the right drive, so we list the disks. We want disk 2, so:
list disk This command lists the disks available to Windows, as we can see by the size that the 3rd disk (Windows numbers from zero, so we want disk 2)
sel disk 2 Sel is short for select, we are selecting disk 2 for editing.
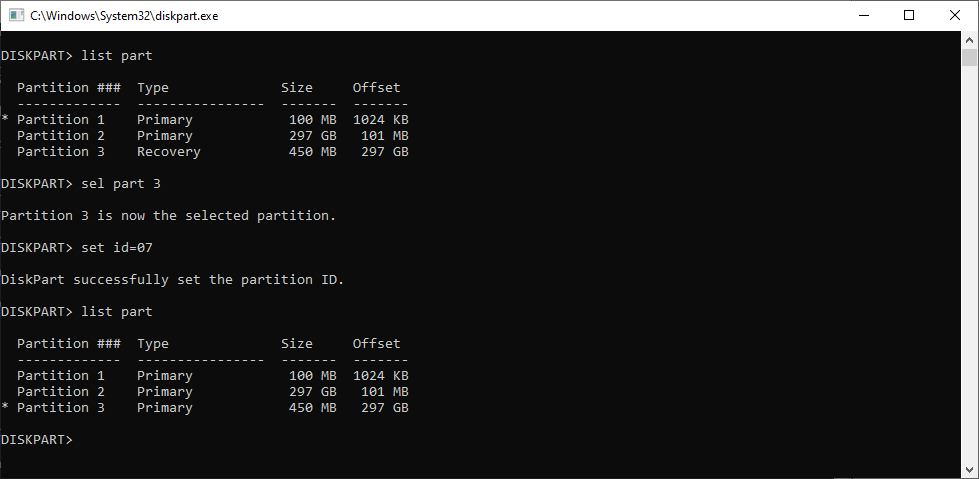
list part List Part tells DiskPart to list the partitions of the chosen disk, which is Disk 2.
sel part 3 We can see that the third partition is marked as type Recovery, which means we cannot delete it.
set id=07 The ID field is the partition type, with 07 signifying a Primary partition type.
del part Del part will delete the current partition. A list disk will show how much space has been freed up.
Repeat steps 2-4 with partitions 2 and 1 to remove all partitions on that disk.
create part primary We can now create a new primary partition.
format fs=ntfs label=”New Disk” quick We can now format the partition with NTFS format so Windows can use it, setting it’s label to New Disk and performing a quick format. If you just specify format, DiskPart will format the partition by overwriting it with zeros with the default file system and the label of Local Disk.
assign letter=E We can assign this partition a drive letter so that it can be seen on Windows File Explorer easily.
exit This exits DiskPart and you can see the entire drive in File Explorer.