

If you have Microsoft Windows XP, Vista or 7, you need to update to the latest Service Pack and certain updates in order to get Transport Layer Services (TLS) version 1.1 and 1.2 enabled so you can use Zoom and other video conference services. Follow the steps to enable these services.
September update: I inadvertently deleted the reg files from the server during the last server move, so I’ve just reinstated them.
Note: Machines running Windows XP and Vista are seriously old hardware that may not be up to the task of running Zoom. Windows XP came out in 2001 and ceased to be sold in 2007 with Windows Vista coming out in 2007 and being replaced by Windows 7 in 2009.
It would be better to replace these computers with either a late Windows 7 equipped with a solid state drive (capable of running Windows 10) or buy a new computer that runs Windows 10.

Identifying your Windows version
Press the Windows key (the one with the flag on it) and R to open Run. Enter cmd and press OK.
Now type: set pro
If you see ProgramFiles(x86) you have a 64 bit system, if you don’t you have a 32 bit system. Write down which one you have, as you will need it later.
Now type: winver
winver tells you what Windows version you are running, in the above picture it shows Windows Vista Home Premium.You can also see Version 6.0 (Build 6000)
Windows XP
Although Microsoft stopped supporting Windows XP long ago, there is a way to install TLS 1.1 and 1.2 on XP.
You need to have Service Pack 3 installed in order for this to work, so if you don’t have this, download and install it first.
Download this registry patch, which enables POS Ready and allows XP to use TLS 1.1 and 1.2. You need to save the file and double click where you save it, then restart the computer when done.
Now go to the steps at the bottom of the page to enable TLS 1.1 and TLS 1.2 in Control Panel
Windows Vista
Service Packs are Microsoft’s method of installing a huge number of updates in one go.
If your computer doesn’t mention Service packs installed, you need to install Service Pack 1 (includes both 32 bit and 64 bit versions)
You must have Service Pack 1 installed before you can install Service Pack 2 (32 bit /64 bit)
Download the 2018-05 Update for Server 2008 (32 bit /64 bit)
Download this registry patch to enable support for TLS 1.1 and TLS 1.2. Double click and install this registry patch on your computer once you have downloaded it to your downloads area.
Restart your computer to enable support for TLS 1.1 and 1.2.
Now go to the steps at the bottom of the page to enable TLS 1.1 and TLS 1.2 in Control Panel
Windows 7
If you have Windows 7, you need to install the Service Pack 1 (includes 32 bit and 64 bit versions) and 2015 Servicing Stack update (32 bit / 64 bit) and finally the Convenience Rollup (32 bit / 64 bit)
Download this registry patch to enable support for TLS 1.1 and TLS 1.2. Double click and install this registry patch on your computer once you have downloaded it to your downloads area.
Restart your computer to enable support for TLS 1.1 and TLS 1.2.
Now go to the steps at the bottom of the page to enable TLS 1.1 and TLS 1.2 in Control Panel
Windows 8 & Windows 10
As of Windows 8, TLS 1.1 and 1.2 are enabled by default, so you don’t need to change anything.
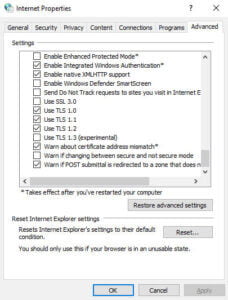
Enable TLS 1.1 and 1.2 in Control Panel
Press Windows key and R and type cmd
Type inetcpl.cpl
This will open the Internet Options Control Panel applet directly.
Click on the Advanced tab and scroll (click on the grey bar on the right hand side, pull the mouse down and let go) to the bottom.
If all has gone well, you will see Use TLS1.1 and Use TLS 1.2, check both these boxes and uncheck Use SSLv3.
