Let’s face it, reinstalling operating systems is a chore. You insert some sort of media, be that floppy disk; CD; DVD; or memory stick/flash drive and the operating system loads and installs.
Wiping drives to reinstall
My weapon of choice is Darik’s Boot and Nuke, also known as DBAN. DBAN boots from a CD and you can then use it to wipe a drive clean so that data cannot be recovered from it. It’s not required for simple reinstalling but if you are disposing of a computer or drive, it is worth erasing all your data.
Unfortunately, when you have 10 computers to wipe, you have to wait for the CD to load and you can start the wipe process before you can remove the CD and move to the next computer, a labour and time consuming process.
Enter PXE
PXE or Pre-boot Execution Environment, is a method of installing computers over a network.
With PXE, I can set up a PXE server on one computer, let’s call that computer A, integrate the install media into it, then choose boot from network from each computer (B in this example.)
Boot Menu
When you integrate install media on computer A, you need some way to access that media on computer B. You do this through a boot menu.
When computer B starts up, you access it’s one time boot menu and choose Internal NIC or Network Boot.
The Boot Process
Computer B starts by asking computer A a series of questions and computer A responds to those questions:
What is my IP address, and how to get onto the Internet?
Can I have the boot menu?
Can I have the operating system my user chose to install?
Once those questions are answered by computer A, then computer B will install the operating system over the network much faster than it can over USB or DVD media.
Setting up your own PXE Server
Perhaps the easiest one I have found is by downloading AIO Boot Creator from aioboot.com
AIO Boot Creator was originally designed to create multi-boot USB drives so that one USB could install them all. However, it also includes a PXE server.
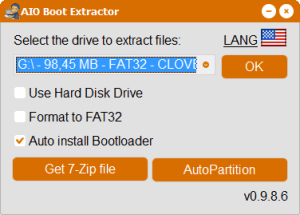
Start by installing AIO Boot Creator to your hard drive by checking the box and choosing the drive, then press OK to install.
With the AIO Boot Creator open on your screen, choose the Integration tab to load ISO media files you have downloaded onto this machine. Select Pack enables you to choose what package you are integrating. which enables settings for that package automatically. Then from Select File, browse for your ISO file and press OK to integrate it.
Click on Run PXE
Follow the instructions on the website under the heading NETWORK BOOT to make sure everything is ready.
Once the PXE server is showing as Online, it is ready to serve installation media to any device on your network.
Potential Pitfalls
When installing Linux Mint over PXE, the computer may be left without a choice of Ethernet in Network Manager. Open a terminal and paste the following to enable management of the network adapter:
sudo sed -i.bak s/false/true/g /etc/NetworkManager/NetworkManager.conf
sudo systemctl restart NetworkManager